Sunday, December 30, 2007

29.12.07 Ogalala Lace


When I saw Smadar's post:
http://smadarstreasure.blogspot.com/2007/12/ogalala-lace.html

Smadar wrote there it took her 3 hrs only to make this beautiful lace that I actually saw and even touched :). I also saw the beautiful creme one that made"Little woman in the street" with very special fossils. I then thought to myself, it is such a nice necklace and it would be a great project for a beading evening.


I felt challenged by that and I started the lace with Smadar's help, based on "Little woman in the street" verbal instructions. Only that to me, the whole thing took 8 1/2 hrs! (I reinforced the necklace at the 8mm beads level, but still it's 3 times more??!)
I don't have an explanation for that, it remains to me a mystery. Anyway, the important thing is that the lace was ready in the last minute to be worn for the meal we had for "Leah and Michael's AP wedding". Hou... (Thanks to Omer that encouraged me to finish it and he also deserves the credit for that picture).


Later on, Smadar explained to me one of her tricks in order to make the lace shorter in time.
She worked with Fireline thread, Miyuki 11 seed beads and didn't pull the thread after each stringing, but only when she got to the middle of the necklace. It can save a lot of time!
I worked with Toho Burgundy G thread, 11 Toho seed beads and a normal needle from which the thread very often slipped out. The big beads I used are pseudopearls, of about 8mm height.
Next time, it's worth to try this trick, but it should be done with a thread that one cannot tear.

For such a necklace as I did - one should take into account about 50gr of 11 seed beads and 33 pseudopearls for a total length of 48cm [I meant the necklace to be 41cm in total and therefore strung 55cm of 11 seed beads in the first step (30% more than intended length), but the total length came out 48cm, considering I strung 2 seed beads, 1 pseudopearl and 2 seed beads in the last step].

Wednesday, December 26, 2007

26.12.07 Porcupine Angjust Bracelet


I do not work very often with Swarovski, but this is my second time I use them.
When I actually saw this bracelet on Zebra's hand - I couldn't resist:
http://www.flickr.com/photos/zebrasonja/2114042003/

You can find the Angjust Bracelet scheme in the following link:
http://www.ileauxperles.com/forums/showthread.php?p=546487#post546487

http://www.ileauxperles.com/forums/showthread.php?t=41042&highlight=angjust
Angjust Bracelet
http://angjust.over-blog.fr/
Angjust Blog

It took me about 6 hrs, including all the reinforcements plus the toggle & clasp. I also had to unpick the last step, so it took also a bit more time. Anyway, I still don't understand from the scheme where the mini-rocailles are inserted in the whole thing and it also didn't came out the same amount of crystals as in the scheme. So for my bracelet I used 48 3mm Swarovski, 64 4mm Swarovski (+20 for the toggle) and 76 4mm Gütermann multicut beads.

Thanx to all my bead commune friends for helping me choosing the better Angjust's pictures.

Saturday, December 22, 2007

22.12.07 Mazal Tov Omer!


This bat scheme appears in the book "Petits Animaux en perles" by Marie-Claude Burel, "chauve-souris" p.34-35. It took me about 3 hrs and I concluded again I don't like so much working with wire nor making animal in this method, it doesn't look to me stable enough.
Last turtle I made in the same method was completely crashed in Omer pockets :)
I Believe this Bat won't hold too long... But Omer likes it...
Unfortunately, as I thought, 2 days later, the bat was harmed. His wing broke, because of the weak metal thread. Now he is just hung in Omer's room...

Wednesday, December 19, 2007

19.12.07 An American Fuchsia Earring, a French Bumble bee and a German Crochet Spiral


* the right picture of the fuchsia flowers is taken from wikipedia:
http://en.wikipedia.org/wiki/Image:DoubleFuchsias_wb.jpg

Today, my little bumble bee flied for her first time and she even found a new friend from the same family.
I finished it more then one month ago, but I still don't know yet what project it will be part of, if at all. The bumble bee scheme appears in Marie-Claude Burel's book - "Petites Betes en Perles - 30 Insectes Et Araignees En Perles De Rocaille" p.58-59 (Bourdon Terrestre).

The Fuchsia Earrings were designed by Vicki Star and appear in her book "Beading with Herringbone Stitch", p.78-87. I thought it would take me about an hour for one earring maybe even two, but I was absolutely wrong. It took me about 5 hrs to finish one earring, so meanwhile I don't make another one, unless I get the mood for that.
I had to use all along a #15 needle, since the so called "11" Pink Matsuno seed beads have a terrible small hole. I also added to the flower a pistil, beside the 4 stamina. If one day I will do it again, I will use a dark thread (pink or purple - but not white!)
Unfortunately, I didn't find in the close vicinity a fuchsia rub , so that I can picture them together. As you can see, I found other alternatives from the neighborhood...

There is a similar fuchsia earring free scheme on the net, in the following link:
http://beadwork.about.com/library/weekly/aa082597.htm (based mainly on peyote and not on herringbone stitch)
You can also see another version of fuchsia earrings in the link below:
http://www.polyvore.com/cgi/thing?id=14038


Finally, here are the homeworks I have done from the excellant lesson I got from Pnina and Varda - on crochet spiral:


The base is of 4 11' seed beads.

For 50 cm of strung seed beads I got a rope in length of 17 cm. It makes 3 cm of strung beads for every cm of rope. It takes me about 25mn per 8cm of rope (25cm of strung beads).

My next step is to add a new thread. As I understood, there are at least three ways to do it:

1. Crocheting the end of the old thread with the beginning of the new thread together for a while. (Using both thread as if they were one).

2. Adding a loop with the new thread in the place where I added the last bead.

3. Like in peyote or other stitches, get into the spiral somewhere and start walking around till I come up to the last bead I came out from.

Let's try...

Tuesday, December 18, 2007

18.12.07 Smadar's Treasure Hojas Bracelet Bugle version


This luxurious Hojas bracelet was decrypted by a very talented commune friend - Smadar.
As far as I know Smadar's works, it has always been proffesional, original, very net and accurate work. She has her special and unique touch on every jewel she creates.
Smadar found recently a treasure box filled with buttons that her mom collected during the years. She started using them in order to create unique toggles and clasps, as you can also see in the pictures.
The amazing photographs are taken by her partner, Ardjan. http://ardjanseye.blogspot.com/
Hence, every creation Smadar does looks as if it was taken from an honoured or well known gallery.
She didn't have a blog nor site, but she kept her promess and opened one so quickly, within a day I posted this comment:
I like very much the way Smadar is writing and I am sure you will enjoy visiting her new-born blog.
Next Sunday, I am going to meet her for the first time :) Want to join?

Monday, December 17, 2007

17.12.07 I had a most EXCITING visit today of 2 surprising fabulous Israeli bead artists

Varda and Pnina visit

I can't tell you how much happy and excited I am, especially I didn't woke up that way...

Two FABULOUS women came today to visit me. They brought with them so much positive energies to me. I cannot even describe it. Colours, light, life, creativity and happiness.
I just feel in High.

Where to start from? - I had a most wonderful evening with 2 very modest bead artists, who has unfortunately no blog and no site I can send you to. I feel so ashamed I cannot share with you a link to visit their work that I had the honour to actually see!
I never saw beadworks in Israel in that level. Their names are Varda and Pnina.
I wish I could learn from their creativity!

The time passed so quickly and we had so many things to talk about. Each piece that Varda brought was so interesting, creative and colourful. She just plays with beads.
I must also describe you that both had a very special coat. Varda had a grass-green fleece and burgundy synthetic fur, while Pnina had a pine-green very well cut coat.

They even taught me how to make a crochet bead spiral and now I have homeworks to do.

This visit was a wonderful and unexpected surprise for this day and I really hope to meet them again.

Varda and Pnina surprised me and they both took the Hojas Saraguro Collar pattern from Chris Prussing. It is amusing because today I saw 3 Israeli pieces of Saraguro beadwork, not from my students. The Saraguro technique is expending itself!

I took a picture of Varda's Hojas collar piece, made with 11 Czech seed beads for the band and 11 Mate Opaque Matsuno seed beads for all the rest:


Varda also sent me a picture of the Hojas Drop Earring she made:

Pnina sent me pictures of the Saraguro Hojas Collar she did. You can see how beautifully it evolved:


Thursday, December 13, 2007

13.12.07 Good news and Bad news with Polymer clay experience - Chapter II


Today's experiment was to check the old oven that we have with a Sculpy thermometer. I first checked only with the thermometer in order to get a scale of the actual temperatures.


I checked the temperature after 10 mn in each level, starting from the lowest. Here are the results:

#1=~50 C

#2=75 C

#3=100 C

#4=~125 C

#3-#4=~125 C

#9=230~250 C

From curiosity, I checked the so called "100 C" in my toaster-oven, on grill from both sides - and guess what?- It was actually 125 C! The Fimo I was trying to bake few months ago burnt there after 5 mn, wonder why... What a stinky fume there was... I will never use anymore this awful toaster-oven. Never!

What to start with - the bad or the good news?

Let's start from the bad.

I made some more polymer clay balls with the same colours and product as yesterday.

I checked them after 20 mn in the oven on #3 (=~110-120 C) and tried to smash them. All of them had started to break, most with deep fractures. I thought maybe the fact that I didn't let them get cold a bit, caused them to crack. I still let them for 10 more mn (total of 30 mn) at the same temperature.

Now again, I tried to break/smash them and you can see what happened; none of them are conserved (even the blue has some cracks from the first smash, but I couldn't break it):

You want to know the good news? - My oven can bake polymer clay without burning it!!!

So now I can use the Microwave for Sculpy clay and Oven for all the clays! :)

I summarized the results in the following picture:

I still need to find the courage to keep on, till I find the right conditions, but I feel I am on a better way than last time...

Wednesday, December 12, 2007

12.12.07 A Microwave experience with Polymer clay - Chapter I

After my poor and lousy experience with polymer clay, I discovered last week that one can bake polymer clay in microwave, but of course not on dry - but covered with water, in a special microwave container. Garie Sim did a remarkable experience she shared with us in the following links and connected links:

http://www.garieinternational.com.sg/clay/shop/twenty.htm

At the beginning, I was quiet afraid to try - with all the toxic vapors that might come out and the recommendations not to use microwave for baking polymer clay, but my toaster-oven is so unreliable that I had no much choice - assuming I want to bake the polymer clay at home and not in the neighbor's oven.


Today I dared to make the experiment.

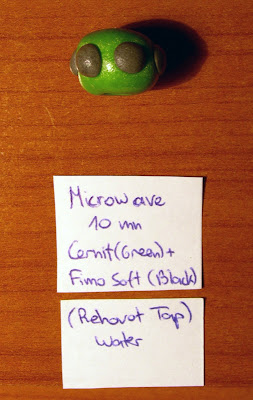
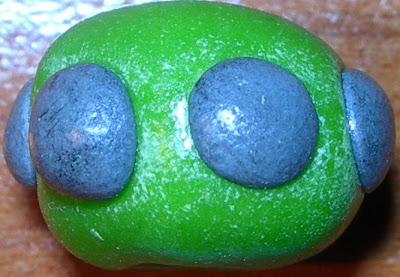
I made one bead with Cernit clay and Fimo clay. After 10 mn of baking in tap water on the max level in the microwave, the bead came out very strong - but also very dusty.

I thought it might be caused even because of an overcooking or because of the disgusting calcid tap water we have here in Rehovot, IL.

You can see the dark spots became grey:

I thought things were going to be OK - as on Garie page, if I do several more experiences to find the right conditions...

Regardless, I needed more polymer clay colours, so I went to our nearby craft shop to buy 3 more packages of polymer clay. I prefer to be constant with one brand - but I liked the yellow colour of another brand then Fimo - so I took it to try. It was made by Sculpey.

I did a new experience. This time, with only 5 mn cooking but with mineral water.

Here are the results:


As you can see, unfortunately, the Fimo behaves very badly, as already shown by Garie (after being overcooked), but this time I just think it is because of the water. I really believe the Fimo connects well with the calcium and becomes so dusty. Bad for me, I have about 8 Fimo packages...
The Cernit green bead was the first I touched and tried to break. Indeed it broke. Is it because of undercooking? Is it because it was so hard to work and the bead that was done wasn't enough agglomerated? However, the colour and texture was better this time as well as less dusty.
Finally , something good and surprising! The premo Sculpey bead came out P E R F E CT!!!
There is hope in all this experiment, although I have only one Sculpy colour :-( ...
Anyway, this is my first positive experience with polymer clay. Let's hope we become more friends in future.
The next experiment will be 5mn in the microwave with distill water over the Fimo polymer clay. I need to get some ddH2O.

12.12.07 A Swirly Beaded Bead


My first beaded ball! This beaded bead took me neto 1 1/2 hr to make.

It is also taken from the book "The Art of Beaded beads - Exploring Design, Color & Technique" p. 30-32., as well with a 16mm wooden bead inside.
However, I had to fix the ends, because it is not as described on the book.
I had to finish on one side with one tubular peyote round after the decrease round, whereas on the other side I had to make a decrease in all the diagonal strips of the 6th round and then bead two rounds of tubular peyote.

10.12.07 A Yellow Pumpkin Beaded Bead


It took me the whole evening to make this Pumpkin beaded bead, neto 3 1/2 hrs.

It is taken from the book "The Art of Beaded beads - Exploring Design, Color & Technique" p. 24-26.
Before closing, I inserted inside a 16mm wooden bead for it to stand better.

Wednesday, December 5, 2007

5.12.07 Irit M's Hojas Bracelets


It has become a tradition now...


I received today a gift for Hanuka. It was a parcel in a squary box, light and cute, sent from the USA.

I went with it in the St as if I got a present from "Papa Noel" or "Mama Hanuka", so happy.

Of course I knew what was inside - but expectation of stuff you buy on the net is full of healthy expectation which makes me so glad when I receive it.

So in fact, it was my wooden spools that I ordered in order to make a free colourful project published on the net:

I expected them to be bigger than they were, but the size was the one I ordered. In fact, it suits delica 11 and not Matsuno 11, but I think it will still be good enough for my purpose. I need to do some modifications to the bands I already did - but nevermind...


I had even transformed them to black, but I ask myself if I should cover them with varnish too or not?!

Sunday, December 2, 2007

1.12.07 Marcelle Hadar's Hojas Bracelet


This Hojas bracelet will now be the 6th within the last 40 days. It was done by Marcelle Hadar, who has very neat works with very good choices of colors. This bracelet reminds me of a pistachio and chocolate ice cream. I also wanted to show it in the context of the accumulating Hojas bracelets we have now, in a Flickr collage slideshow, but I discovered I cannot do that since I don't have the "pro" account.
Nevermind...

I have been starting to work on a very fun project. I won't tell you yet what it is. I can only tell it starts with an O and ends with an A. Any guess? - But even if you are right, I can't tell you because I want it to be a surprise.
The thing is I may need to buy a delica color that I don't have for that project and I hope it won't take too long till I get it.
Meanwhile I keep working on it... Ciao!